
How To Edit Magazine Worthy Photos Right On Your Phone
Hi there! My name is Calvina Nguyen from Calvina Photography. I’m the lucky girl who’s been photographing Ellie Fun Day’s brand for the last 7 years. I’ve thoroughly enjoyed working with Sarah to develop the photography part of the EFD brand over the years. Everything you love about the EFD products; the soft & sweet, the whimsy, the wonder, the amazing attention to detail, plus that extra little bit of attitude is all there in the photography. I’ve loved it all. Plus, who wouldn’t enjoy making faces at babies and running around with little kids in the grass? I might have even snuck a fruit snack or two on set while no one was looking…photography can be hard work, you know.
Being a mom too, I totally understand what it feels like to want great photos of your kids, but you want them fast and easy. It really does not need to be complicated. I’m here to break down the mystery into simple steps. I will show you how to get Ellie Fun Day’s signature look with photos submitted by one of you.
ALL YOU NEED IS:
-
Your camera phone
-
VSCO app installed (IMHO the best no-fuss editing app for your phone, it is super easy to use!)
-
Your adorable kid. Awake, asleep, crying, eating…doesn’t matter.
THESE ARE THE MOST IMPORTANT THINGS I CONSIDER when I go into editing each photo. I will then show you how I approach each in VSCO.
-
Composition (Is it straight? Off center? Skewed? Are there distractions?)
-
Light and exposure (Too Dark? Too Light?)
-
The FEEL (Which preset should I use?)
-
What other adjustments do I need to get exactly the feel I’m looking for?
CHALLENGE #1: Tricky Lighting
Isn’t that always what happens? Our kids decide to do something super camera worthy, but it’s always in the darkest part of the room next to the funky tungsten lamp…I know I’m not the only one. So before you make the effort to train your baby to always find the perfect window light, know that you have some options right on your phone. Because look at this magical before and after!

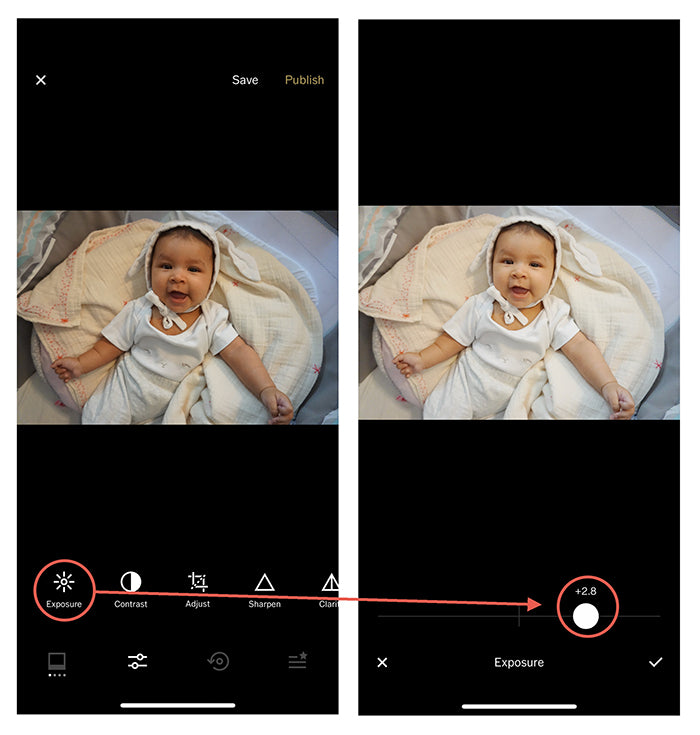
Thank you for submitting the photo of your your little bunny, @lilliananoelle!
EXPOSURE
Because this photo is already so well cropped, I will jump right into adjusting Exposure. This photo was taken in very low light. So the first thing we want to do is to brighten the image by turning up the exposure.
PRESET
The color carries a yellow cast, I’m looking for a preset that does the best job to balance out those golden tones. After some scrolling, C4 seems to do the best job at neutralizing the warmth while giving the image a lot of depth. We will keep it on full blast.

DESATURATE
When working with an image that is leaning yellow, a quick solution is to slightly adjust the saturation to tone it down.

HIGHLIGHTS AND SHADOWS
Babies are sweet and soft. So to get a softer image, I toned down the Highlights and Shadows under “Tone" to mellow out the contrast.

WHITE BALANCE
We’re so close! Here’s the final polish. I am bringing back some dreamy blues and soft pinks in the image by adjusting the Color Temperature and Tint. This final touch gives this image the soft whimsy Ellie Fun Day is so well known for. THAT is how we work with the tricky yellow cast of the tungsten light.

BEFORE AND AFTER
Here it is. Now you know how to deal with tricky lighting.

__________________________________________________________________________________________________________________________________
CHALLENGE #2: Low Light and Difficult Shadows
Sleeping kids are simply the best. Really! Those puckered lips, long eye lashes, and the blessed silence. THE SILENCE! I know you want to take photo after photo. But what can you do, when they fall asleep so perfectly in a part of the house that has challenging lighting? In this case, there are some spotty shadows and the light is pretty low. Quite honestly, I like the shadows here, there is this feeling of dreaminess as if she has fallen asleep under a tree that makes me want to preserve them.

Thank you for submitting your image, @hgwinnfran
SKEW
Before I begin with adjusting the appearance of the image, I always make sure it is straight and composed how I want it first. This photo was shot close to the head tilting away from her feet. I’ve skewed along the vertical axis. The skew tool helps to make the baby look more proportionate. Added bonus: this got rid of the distracting wood floor at the bottom.

EXPOSURE
The photo is under exposed, so we need to brighten it up by pumping up the exposure. But notice how the shadows changed...

PRESETS & CONTRAST
I LOVE all of VSCO’s “A” presets and I go back and forth between all of them depending on what I’m going for. For this one, I think A8 gives me the soft and whimsical feel that EFD is so well known for. I dialed it down to 9.
Remember how we lost those pretty shadows when we brightened up the image? Here’s bringing some back.

TEMPERATURE
Most of Ellie Fun Day’s photos lean towards the cool side. So I’m dialing down the temp just slightly to finish the look.

BEFORE AND AFTER
We’ve identified the part of the image that we wanted to preserve, the shadows. Then we adjusted a lot of things in the colors and brightness that entirely changed the feel of the photo. What do you think?

ALL DONE. PLEASE SHARE YOURS!
Easy peasy. Now post your photo to Instagram and tag @elliefunday and @calvina so we can see what you’ve done! I cannot wait.
I MADE A GIFT JUST FOR YOU!
Because you’re special to Ellie Fun Day, I’ve made a downloadable PHOTOGRAPHY CHEAT SHEET just for you! Head on over to calvinaphotography.com/elliefunday.
For more tutorials like these, photo goodies, or just to say “hello," head on over to calvinaphotography.com.
Leave a comment
Comments will be approved before showing up.


